Friday, April 1, 2011

April Fool's!

No, it’s no April Fool's joke; it’s an actual blog post. Yes, it’s been 3 months, and I pretty much immediately broke my resolution of making a post at least once a week, but I was waiting to be able to show some real progress. Yeah, that’s it…let’s go with that excuse.

Well, despite MY slacking Mark has been working hard on the rooms on the main floor, and it won’t be long until my studio/craft room, his study and the guest bathroom are completed or nearly complete. Too bad we won’t have any bedrooms or a kitchen so we can finally move in, but it will come in time… I think…I hope!

Anyway, on to the progress report.

All the love is gone in my studio……covered by fresh, clean drywall painted Worldly Gray. My fancy red Restoration Lights have been hung, as have Mark’s customized moldings. This wall is now ready for the built-in desk that Mark will design and build.

The niche in the east wall is completed too, and we just need to decide what piece of furniture is most suitable for that space, likely a book case.

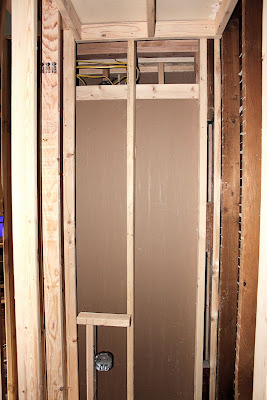
The little closet still needs some work, but Mark has to figure out where to move the heating vent to before he does so. The easy thing would be to locate it under my desk, which would be heaven for me, but it would actually end up being right under the printer stand. Mark will figure it out. He’s pretty good at coming up with a solution to any problem he runs into!It's crazy to think that this room looked like this just about a year ago!


The new hallway is mostly drywalled, and now lighted. The piece at the end of the hallway will eventually be cut into a doorway leading to the addition and our master suite.

This is just proof of what a perfectionist Mark is and how he constantly strives for symmetry - the door leading into the original hallway was obviously not planned very well because one side of the molding around it had to be cut skinny to fit. They probably didn’t take into consideration the thickness of the plaster when they originally cut the doorway. This, of course, was something that bothered Mark terribly and that he knew would bother him for the rest of his life, so he took on the task of moving the doorway over a few inches to line it up with the new hallway and allow for a full piece of molding to be installed around the doorway!

Immediately on your right as you walk into the hallway is a small closet that will either end up being a linen closet or a closet for the vacuum, broom, etc. for the main level.

As you continue down the hallway, my studio is on the left, and the new, teeny tiny guest bathroom is right across. There’s just enough room in this bathroom for a sink and a toilet, but that’s all a guest bathroom really needs. We surely don’t want people hanging out in there or laying around on the floor!

It’s so teeny, it’s difficult to photograph, but the sink/vanity will go on this end, the window will be gone, and the toilet will be on the other end of the room. The plumber has already come and installed everything, so it’s good to go!

Mark devised a slick way to put the piece of green board up on the ceiling because there weren’t a lot of studs to drill into, so he had to use a combination of screws and liquid nails. He made three supports, and we rested one end of the green board on the top of one support, pushed the board up, and slid another support in, then put the middle support in after it was up on both ends. We left the supports up for a few days while the liquid nails set, and so far so good!

Now that my little studio is close to being done, Mark can focus on his study again. He’s begun working on the wall of bookcases on the south wall, and will install the lights in them as soon as he can get up there while it’s still light, likely this weekend.

The molding is up, and Mark will start working on the box beams in the ceiling next. This will involve a series of precise, intricate cuts and is something that he’ll have to be totally focused on. It’s definitely going to be a time when the kids and I aren’t around!

Mark is planning to match the arches in the living and dining rooms in his little printer/file cabinet niche, hence the white, plastic doo dad (sorry, I don’t know the technical name for it!).

It would be silly to think that Mark would only focus his attention on the inside. In fact, he’s been working outside every chance he gets, and has managed to fill our two green waste bins all through the winter. He took a week off last week, and we spent a day working on Bella’s playhouse that we laid the foundation for last fall. Here’s a sneak peek, but it’s all you’re gonna get until the big reveal at Bella's open house party! Let’s just say it’s going to be pretty deluxe!

You may think that we don’t have our priorities straight, and should be focused on getting the house done so we can move in, but the playhouse is something that Mark has wanted to build for Bella since we found out we were having her, maybe even before! Now that we finally have a big enough yard, and a house that we plan on being in for a long time, we thought we’d better finally get going on it. Plus, Bella’s not getting any younger AND our kids are always our first priorty!


Last week between the snow and rain showers, I decided to tackle a little more of the North 40, and we decided that we’d better get the grapes in control before it was too late. From what we read on the internet, they’re supposed to be pruned in late winter, so we were a little off, but not much.

We unwound the miles and miles of vine from the apple tree, and miraculously were able to trace the vines back to the main plants. We nervously cut them to about 12” based on what we’d read, and are really hoping we haven’t killed them!

I was quite pleased with the grape jelly I made from the grapes last fall, so I’m really hoping they come back. It’s possible that we won’t have any fruit this year after cutting them back so drastically, but that’s okay as long as they come back next year. Mark will build some trellises that they can grow on, and hopefully they’ll be much happier!

This area still has a lot of work to go before it will be a good garden space, and Mark has to figure out what we’re going to do with all the pavers and cement pads the previous owners felt inclined to put everywhere. He says the space isn’t nearly big enough for a garden as is, so the pads and pavers will likely have to go.

The apple tree will likely go to because it’s clearly dying from neglect, and even if we could resurrect it, it would shade the garden too much. Last fall, a huge limb broke off, and we’ll have to have some tree guys come and remove it.

While we were cleaning up the grape vines, Mark got up on the roof of the shed to try to get some of the vines that had wound their way up to the tops of the apple tree. He decided to kick a limb off that was clearly rotted and ready to fall of anyway. We noticed three large holes in the wood, and wondered if it was woodpeckers that had made them. We got our answer when Mark kicked the limb off and a whole pile of acorns and walnuts came rolling out. Apparently it was a squirrel’s winter stash, and we’d just destroyed his home!

Picture 1- the part of the tree that the limb broke from and some of the remaining acorns. Picture 2 - one of the three holes on the limb. Picture 3 - the inside of the limb and the tunnel running from one hole to the next.

Mark felt terrible about destroying a squirrel's home and vowed to build some squirrel houses in the future. The next day we were talking to the neighbor who lives behind us, and he told us it was likely Figaro’s, the resident squirrel’s stash.

This may or may not be Figaro; I’m pretty sure there’s more than one squirrel in the neighborhood. This guy was hanging around the telephone pole after the home destruction incident, and we wondered if he was the owner of said home. If so, I’m sure he wasn’t too happy when he returned to find his home destroyed and his stash all over the ground. We feel sooo bad!

Well, this has turned out to be quite the long post, but I guess that’s what happens when you only post every 3 months! Who knows when the next post will be, but it will be sure to have some interesting tidbits and signs of progress in it. It’s always an adventure at the Atkin house!

Saturday, January 1, 2011

Happy New Year!

It’s hard to believe it’s been nearly two months since I posted a blog entry! With all the craziness of the holidays though, it was a chore just to keep up with our day to day activities, let alone write blog entries. I guess I should make it a New Year’s resolution to get back to posting an entry about once a week, but like all the resolutions to exercise more, spend less, drink less, eat less, etc., I’m sure it will go by the wayside in a month or two. We’ll see what we can do though.

In between cooking a Thanksgiving turkey, attending various holiday events, and participating in all the usual holiday activities, Mark has made some visible progress on the main level of the house.

In his study he’s framed the south wall, which will be a set of three bookcases.

He found a way to get around having the big pipe in the wall (see before picture below) moved by designing decorative columns in the bookcase. I’ve decided he can figure out a way around just about any obstacle in these old houses!

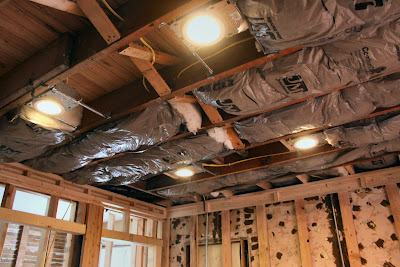
He’s also installed four lights in the ceiling, transforming the room from a dingy, dimly lit room…

to a bright but energy efficient room!

Mark's temporary entertainment center in his study. This is how he keeps his sanity while working at the house by himself all the time!Note the PBR and Milwaukee’s Best. This is the same beer I posted on Facebook that I had in my shopping cart the other day along with a big bag of cat food, making myself look like an alcoholic cat lady.

The old bathroom has now become a much smaller guest bathroom with enough room for a toilet and sink.

Before:

After:

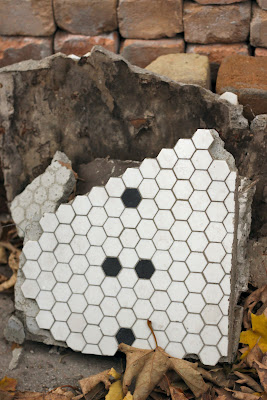
We actually would have liked to salvage the tile from the bathroom floor, but it was impossible. Maybe we’ll figure out some cool, creative art project to use it on. For now it resides outside with the old bricks from the fireplace.

Mark tore out the linen closet and drawers in the old hallway and took the closet on the north wall of the back bedroom to create a new hallway, which will eventually lead to our master bedroom once the addition is finally built.

Before:After:

Mark in the new hallway. Don’t mess with him when he has his heavy duty mask on!He bought this mask after he found out that a lot of the insulation he’d been removing likely had asbestos in it!

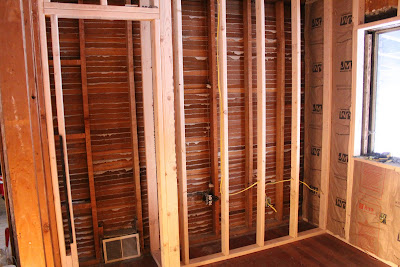
The back bedroom, which will be my studio/craft room is pretty much all framed and ready for drywall.

Following is the progression:

Before the previous owner had moved out (Southwest corner)After move out (Northeast corner and doorway)South wall

During demo (Northeast corner and doorway)
South wall
West wall with the bricked in window that was discovered during demo and the closet that is now the hallway.
Southwest corner (you may recall from the fun finds post that this is the "LOVE" room).
East wall
East wall framed. The doorway has been moved south a bit, and there is a small closet for storage and a niche for a bookcase or other piece of furniture. The wall on the other side of this niche will be punched out for a built in buffet in the dining room.
Can lights above the niche to spotlight my current favorite photos.
The west wall. This will have a built in desk going along the length of the wall for my computer, sewing machine, etc.

Finally, the most exciting news (I think) is the installation of the French doors on the east wall of Mark’s study!

These open out into the living room and just give the whole place a different feel!They look great already, but they’ll be beautiful once they’re stained, have the moldings installed around them and have the fancy new hinges from Rejuvenation Hardware installed!

It’s so encouraging to see some visible progress. Stay tuned for more next blog entry!

Sunday, November 7, 2010

Out in the North Forty

Holy cow, I can’t believe it’s been a month since my last post! With lingering colds, Mark's various night meetings, Halloween activities, and all the other little life interruptions, progress has kind of slowed on the house. Mark is picking up the pace now and bought a big load of boards last night to continue his framing of the study and to start the framing of the hallway, half bath and my studio (I’ll post some progress pictures in my next entry). He had a cathartic experience taking a sledge hammer to the bathtub in the downstairs bathroom, and highly recommends it to anyone who needs to take out their anger or frustrations. I really wish I’d taken some pictures of this event because Mark informed me he smashed up most of the tub after work one night in his work clothes! What better way to take out the day’s frustrations?

I’ve been going over to the house at least once a week and working on the area I call the North 40. It’s technically the South 40 as it’s in the far south area of the yard between the garage and the back fence. We plan to make this the garden in the future and thought we’d better start raking some of the mess up. We have two green waste bins from the city, so it’s our goal to try to fill them both every week with big stuff that we don’t want to compost.

This is a before picture of part of the area.

As I began raking up all the debris in this area, I discovered that underneath about six inches of composted leaves, rotted fruit, etc. there were big sections of bricked patios that we had no idea existed. It looks like the Theobald’s, who I mentioned in a previous post were the owners of the house in the 70's and who did brick masonry as a hobby, may have intended to brick the entire world, or at least their entire yard. Two sections next to the garage and the west fence are big slabs of concrete or cement, but the other areas are filled in with red brick pavers.This is a before picture of back part of the area next to the garage.

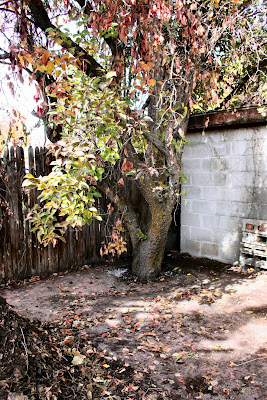
This after picture of the same area (or nearly the same area) shows the concrete slabs I unearthed (literally). The tree in the corner is a pear tree and the concrete slabs go right around it.
This is the huge pile of compost I ended up with after clearing off the concrete slabs (it actually looks more impressive in person). Mark wants me to sift it all so we can use it around the yard. I'm sure it's great compost, and it would cost us a pretty penny to buy that much compost, but man it's going to take a while to sift all of that!
Another find in this area was more on the creepy side, and I hesitated to photograph it because it was a large clump of hair - human hair! We found one big clump, which we promptly threw in the garbage, then I found this smaller clump a few days later, which I of course photographed!

Thankfully, it appears to be synthetic hair, but I still get creeped out back there sometimes thinking I’m going to unearth some human bones next!

Another interesting find, but on the less creepy side was this huge tank, likely some sort of fuel tank.

We’d seen the larger hose sticking up out of the ground, but never really thought anything of it until Mark started poking around with the rake back there one day and hit something metal. This, like everything else was covered in six inches of compost, and as we started uncovering it, we were nervous that we’d found a coffin (this was after the hair incident). We’re thinking we’ll put this out during clean-up next spring in hopes that someone will come and take it for salvage.

And the last of my interesting finds in this area is a bottle that I discovered while raking some of the junk off the corrugated roof of the lean-to. It appears to be some sort of liquor bottle. Someone must have been having a good time, and wanted to hide the evidence!

I mentioned in past posts that there’s a sad, old apple tree growing back in this area with grapes growing all through it. About the second week of October the grapes were perfectly ripe, so Bella and I went over on one of the days she had off for UEA and picked a bucket of them. They’re concord grapes, and they smelled sooo delicious! I got ambitious and decided I’d make grape jelly out of them. I’ve made grape jelly once before out of grapes from my dad’s yard, and it was a pretty disastrous experience that ended up in a jammed up garbage disposal (don’t ask, and don’t bring it up with Mark…it’s still a sore subject). Anyway, I though I’d give it a go again and did more research and preparation this time. The results were much better, but I’m telling you, it’s a loooong process!

Once you clean and remove the grapes from the stems, you cook them for about 15 minutes to soften them up.


At this point you’re supposed to mash them up with a potato masher, which surprisingly I do not have. I started mashing them in small batches with a spoon and a fine strainer, but quickly decided that was not the way to go and got out my trusty food processor.

When I finally finished mashing all of the grapes and straining them, I was left with one bowl of skins and seeds and one bowl of delicious smelling juice.

The juice went into the fridge overnight so the crystals could separate. This is something I didn’t do the first time I made grape jelly, and the jelly ended up with little sugar crystals. Not a huge deal, but most people don’t really care for crunchy jelly! I passed the juice through a jelly bag to get all of the crystals out, and we were finally ready to make jelly!

We only ended up with 7 small jars of jelly, but it’s quite delicious, and I dare say worth the time it took to make it. I used the lower sugar pectin because the grapes were so sweet, and the jelly has a really good grapey flavor.

It's quite yummy on toast!

I had a little bit of the grape juice left over from making the jelly, so we poured it into a glass and drank it straight – no sugar added. It was super sweet and delicious!

I’m hoping that now that we’re giving this area of the yard some attention and that the grapes will likely get care and water on a regular basis that they won’t totally suck next year. What if they’re so sweet and flavorful because they’re neglected and get just enough water to make them super sweet? I think some grape growing research is in order!

Well, I thought I'd leave you with an image of fall from the house. We're lucky to have a lot of beautiful, mature trees in the yard, all of which are displaying their gorgeous fall colors right now. What's not to love about fall, especially when you can enjoy colors like these. Happy Autumn!